Latest content
Explore and discover our latest tutorials
Tech Articles from your friends at Oracle and the developer community.
This tutorial walks you through the process of deploying and configuring a microservices-driven application on Oracle Cloud Infrastructure (OCI). Here are the main steps:
You configure and deploy a set of microservices by using Oracle Cloud Infrastructure Container Engine for Kubernetes (OKE). These microservices create a pet store named MuShop.
The following image shows the architecture of the MuShop retail application.
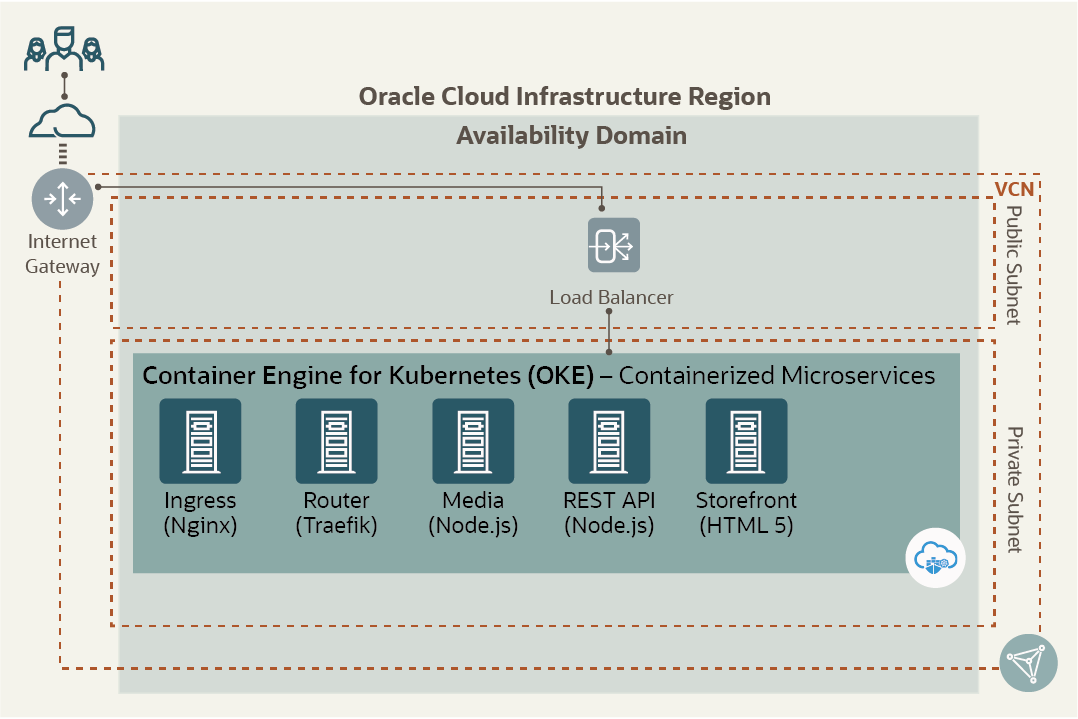
Figure 1: MuShop pet store retail application architecture
To complete this exercise, you need the following resources:
In this exercise, you create a cluster by using the Oracle Cloud Infrastructure Console. Using the Console provides a quick way to create a cluster with several defaults automatically applied. For more detailed setup information, and to take more direct control of the resources, see the documentation.
After the cluster is active, you can use standard Kubernetes tools like kubectl and helm to interact with it. For these tools to connect to your cluster, Kubernetes uses a file that contains the cluster access configuration.
In this exercise, you use Oracle Cloud Infrastructure’s Cloud Shell to interact with the cluster. Cloud Shell is a cloud-based terminal that’s preconfigured and loaded with essential tools and settings to make interactivity with Oracle Cloud Infrastructure easy. Note that we’re using Cloud Shell only for convenience here. The tools can always be set up on developer workstations instead.
kubectl get nodes
The command should return a list of nodes in the cluster that you created and some information about them. For example:
NAME        STATUS   ROLES   AGE    VERSION
10.0.10.2   Ready    node    124d   v1.14.8
10.0.10.3   Ready    node    124d   v1.14.8
Now that you have a cluster and can interact with it, the next step is to build your application and deploy it to the cluster. The following steps outline the process of deploying this application:
Clone the code repository for the application. The Git source control tool is built in to Cloud Shell, and you can run the following command to get the source code:
git clone \
  https://github.com/oracle-quickstart/oci-cloudnative.git \
  mushop
Then, change the directory. This is necessary because the following steps use file locations relative to the root of the source code.
cd mushop
The application consists of two sets of components:
We separate them in Kubernetes by using namespaces, a resource that can route traffic to multiple applications without each application having to create its own load balancer.
To prepare the cluster for the application, run the following commands:
kubectl create namespace mushop

kubectl create namespace mushop-utilities

kubectl config set-context \
  --current --namespace=mushop

helm dependency update deploy/complete/helm-chart/setup
Helm manages the application deployment as a set of Helm charts, which lets you manage the various individual services and their lifecycles easily.
Install the Helm charts for the application as follows:
helm install mushop-utils deploy/complete/helm-chart/setup \
  --namespace mushop-utilities

helm install mushop \
deploy/complete/helm-chart/mushop \
-f deploy/complete/helm-chart/mushop/values-mock.yaml
Now that the application is deployed, you should be able to access it from anywhere. The application manifest—the description of the application for Kubernetes—includes an ingress controller, a resource in Kubernetes that can route traffic to multiple applications. It has already set up an Oracle Cloud Infrastructure load balancer for you and has wired the routes for the MuShop application that you deployed.
To access the application, use the public IP address of the load balancer that was created. To find this, use the following command:
kubectl get svc -n mushop-utilities | grep ingress-controller
The second IP address in the output is the external public IP address where the application is available.
The application is fully functional, and navigating to the IP address by using your browser should display the home page for the application, as shown in the following image.
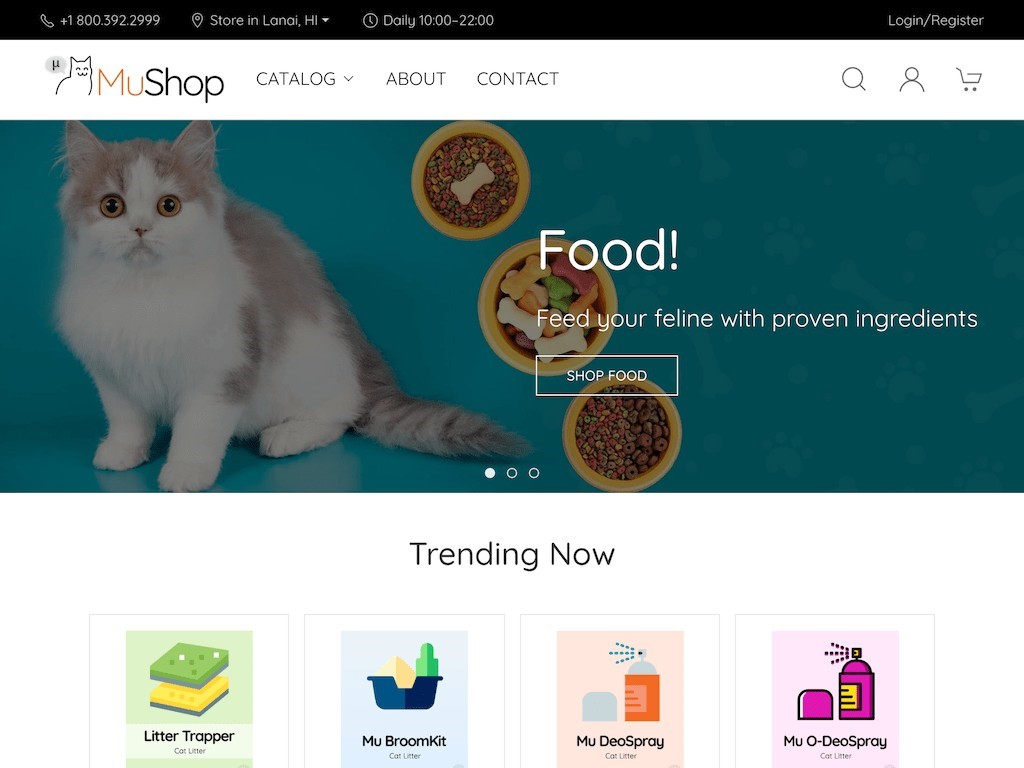
Figure 2: MuShop home page
Now that the application is deployed, you can make a change to it and deploy the change. Here’s the process:
This application’s home page has a promotional banner, and you can change it quickly to see the effect.
cd src/storefront/src/templates/data/
_data.pug file using your favorite editor.var promo section.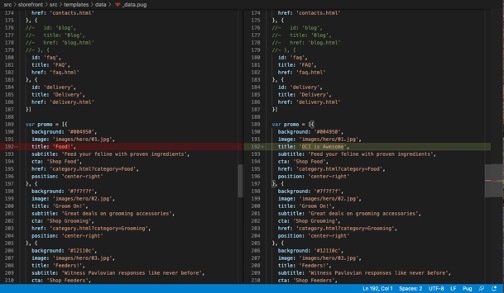
Figure 3: Storefront service code change
Rebuild the application with a new beta flag.
docker build --build-arg version=2.0.1-beta -t mushop/storefront ~/mushop/src/storefront
Now that you have an updated image for the application that contains changes, you can push this image to Oracle Cloud Infrastructure Registry (OCIR), Oracle's enterprise-class private Docker registry.
To push a container image to a Registry repository, you first need to generate a user auth token. Use the following steps to generate a token.
Now you can log in to Registry and push the image:
1. Log in to Registry:
docker login <region-key>.ocir.io
2. When prompted, enter your login name (email address) and password (auth token):
**Username**: <tenancy-name>/<user-name>
**Password**: <auth-token>
3. Tag the image with the path to the repository:
docker tag mushop/storefront <region-key>.ocir.io/<tenancy-name>/<repository-name>/mushop-storefront:2.0.1

docker push <region-key>.ocir.io/<tenancy-name>/<repository-name>/mushop-storefront:2.0.1
You need to change this repository to public so that you can pull this image during redeployment without
adding imagepullsecrets in the Kubernetes YAML.
4. From the main menu in the Console, select Developer Services, and then select Container Registry.
5. Click the repository, and from the Actions menu, select Change to Public. To reconfigure the application to use the new image, you update the Helm chart that specifies which version of the application to use for your deployments.
6. Edit the deploy/complete/helm-chart/mushop/values-mock.yaml configuration file, and add the
following text:
storefront:
  image:
    repository: .ocir.io///mushop-storefront
    tag: 2.0.1
With the values configured, deploy the application:
helm upgrade --install mushop \
deploy/complete/helm-chart/mushop \
-f deploy/complete/helm-chart/mushop/values-mock.yaml
To watch the progress and readiness of the deployment, run the following command:
kubectl get pod --watch
Refresh the MuShop application web page to see the change. A new promotional banner of “OCI is Awesome!” is displayed, as shown in the following screenshot.
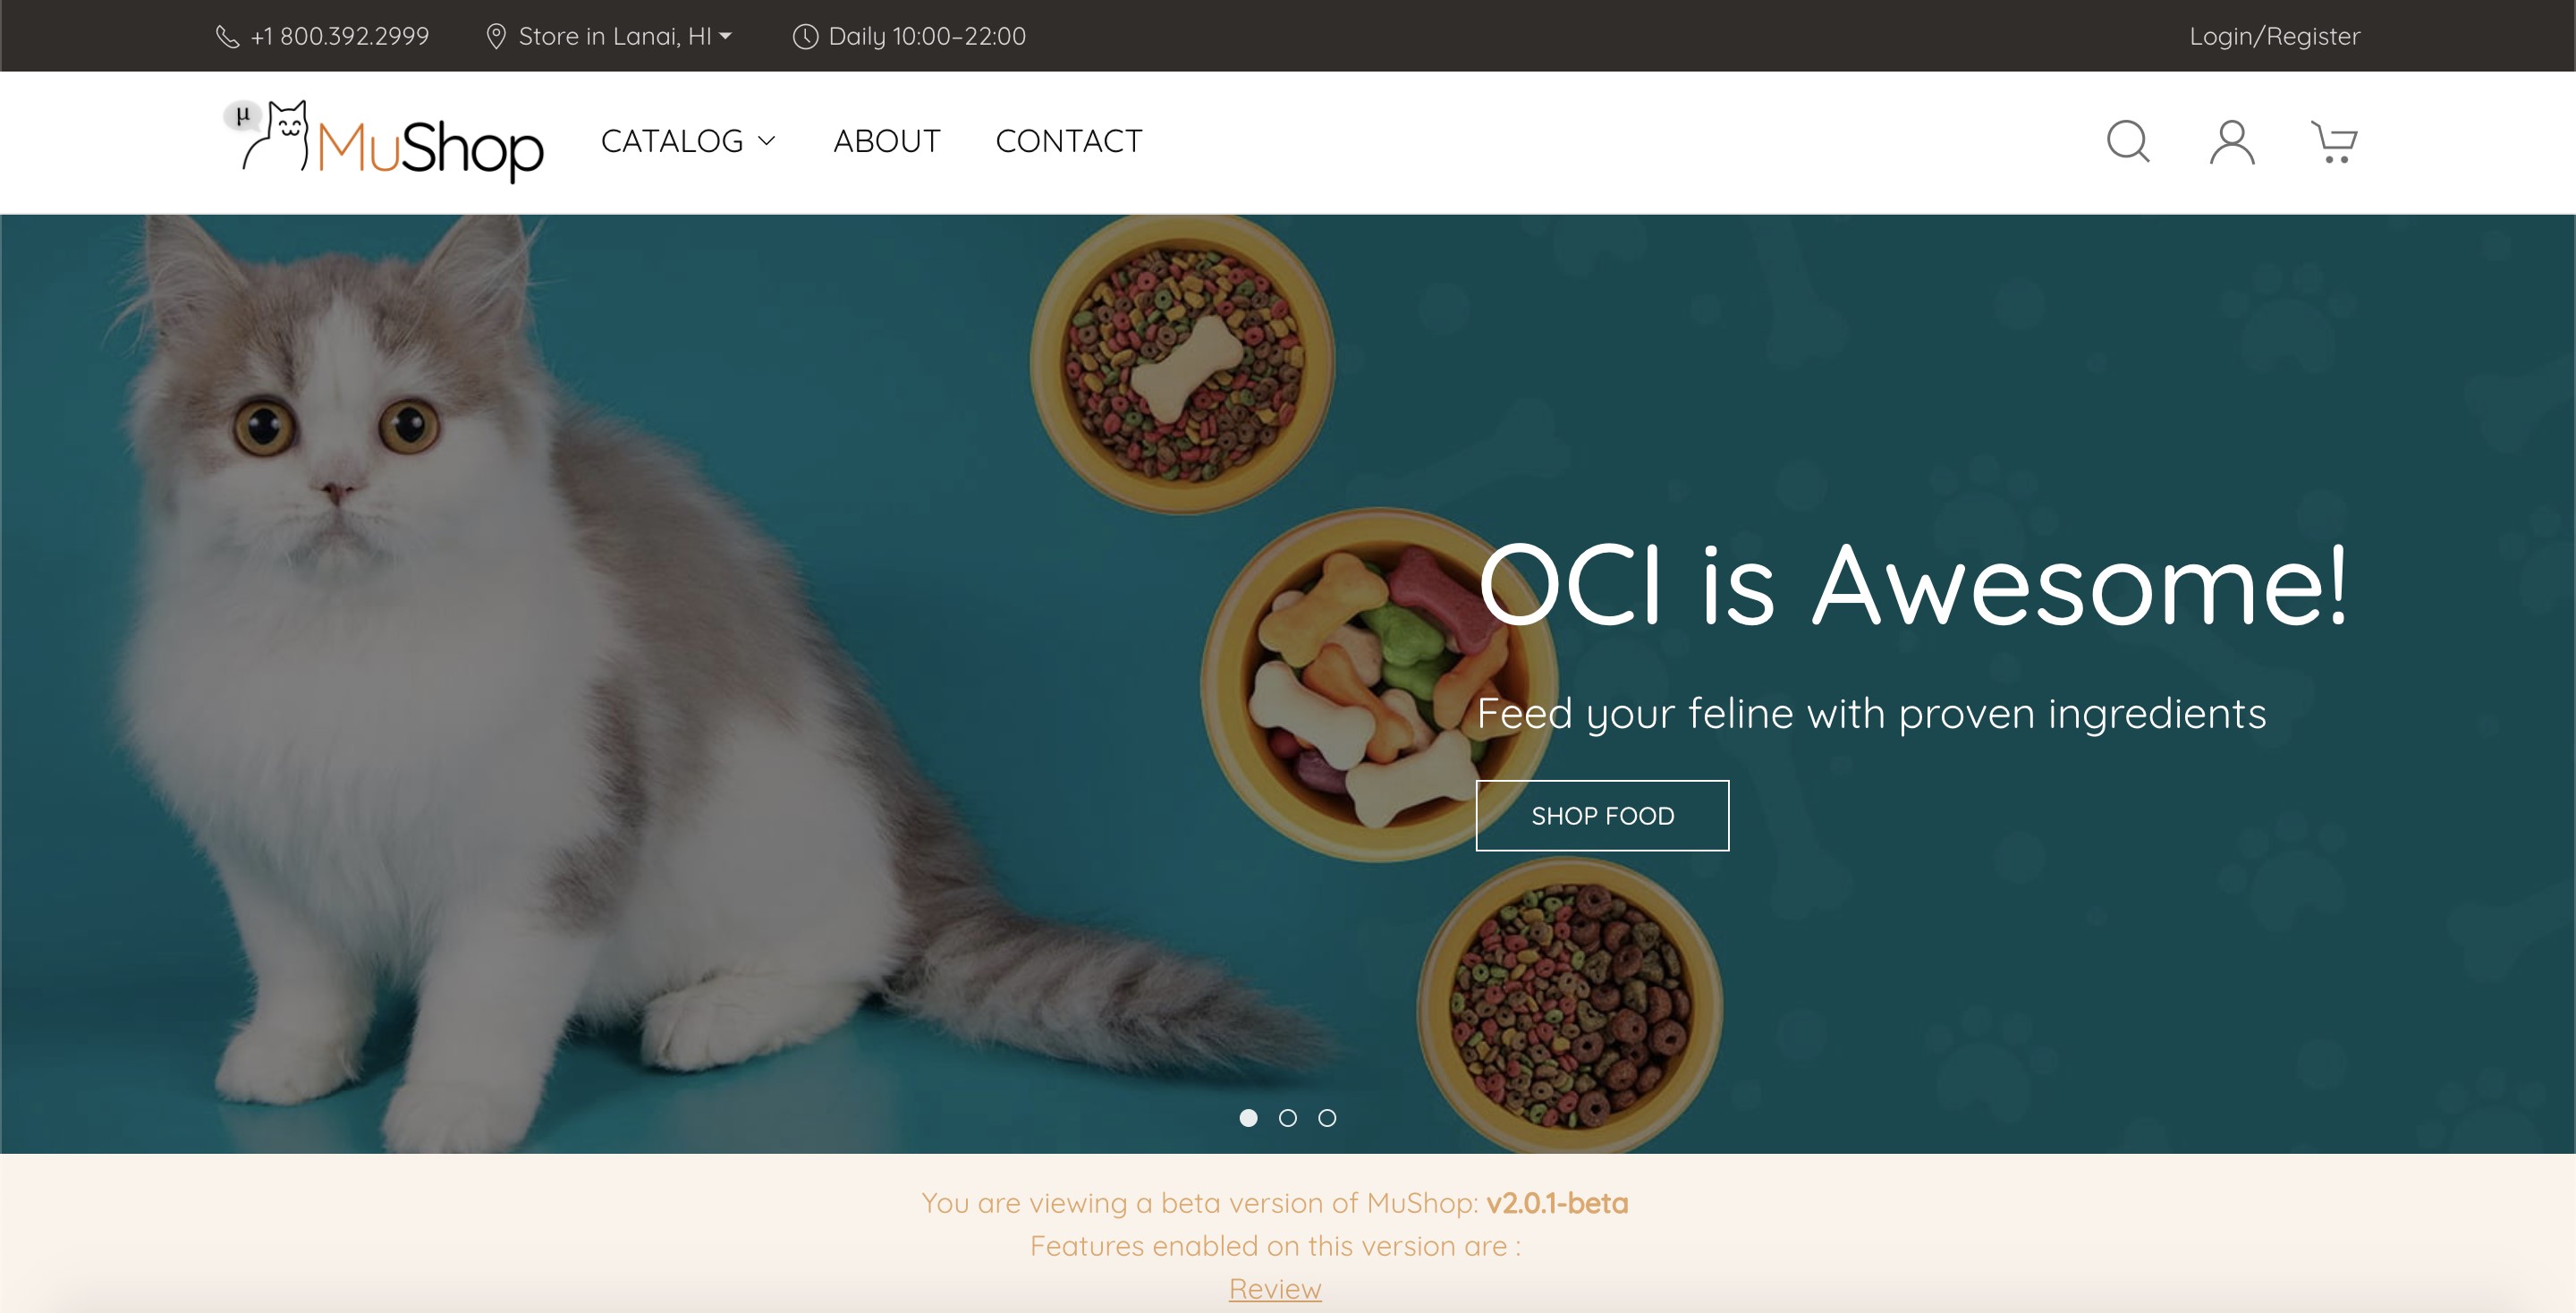
Figure 4: Updated MuShop home page


