Latest content
Explore and discover our latest tutorials
Tech Articles from your friends at Oracle and the developer community.
If you’re developing database applications on AWS and need real-time analytics and extremely fast queries, that’s what MySQL HeatWave on AWS was built to do. Instead of crafting complicated ETL pipelines to move data around to a separate analytics database, HeatWave leverages in-memory acceleration to provide real-time analytics (OLAP) functionality without impacting the performance of transactional workloads (OLTP). MySQL HeatWave is a fully managed service, which allows developers to quickly create and deploy secure cloud native applications using the world’s most popular open source database. MySQL HeatWave is developed and supported by the MySQL development team at Oracle.
One of the best things about MySQL HeatWave is the ability to run analytics directly against your existing transactional data, which means you only need to manage one database instead of two, and can get real-time, secure analytics without the complexity, latency, and cost of ETL duplication.
To get going, let’s Start for free on AWS. A quick sign-up will provide $300 in free credits to see just how awesome MySQL HeatWave on AWS can be.
Provide Country/Territory, first and last name, plus an email address for verification.

Click Verify my email
Upon clicking the link in the email verification message, you will be prompted to provide a strong password, a cloud account name, and a home region. Select US East (Ashburn) as the home region. NOTE: If you do not choose IAD / Ashburn as your home region, you will need to request region limit increase. Once that is increased, you will be able to subscribe to Ashburn region (this is required for HeatWave on AWS).


Complete the registration process by entering an address and billing details.
Accept the agreement and click Start my free trial

Within a few moments your account will be created and you will be able to log in!
On the main dashboard you should see the banner to get started with MySQL HeatWave on AWS. Click Go to service.

On the next page you will have an option to Request Upgrade which will convert your account to a paid account. Don’t worry! You won’t be charged anything…remember you have $300 in free credits to play with.

Note - It will take a few minutes for all of the backend processing to complete before you can complete the upgrade process. If you receive a message indicating the same, feel free to step away for a bit. Give your eyes some rest.
Once you are able to complete the upgrade process, you can move on to the next step.
Since you selected Ashburn as home region, you should be able to skip to step 3, which guides you to request the HeatWave on AWS service limit.
Once you get the service limit, you can enable HeatWave on AWS.
You’re now ready to set up a MySQL HeatWave cluster on AWS!
Note that MySQL HeatWave on AWS is integrated with OCI’s Identity and Access Management system. When you sign up for HeatWave on AWS, you’ll be directed to the OCI login page where you must sign in with an OCI Cloud Account (which you created earlier). To keep things simple, billing is managed and monitored within OCI.
To start working with MySQL HeatWave on AWS you need neither AWS experience nor an AWS account. However, if you do have those, there’s no limit to what you can do to integrate AWS apps with MySQL HeatWave. So let’s get going!
Log into MySQL HeatWave on AWS
If you’ve just completed the sign-up process and logged in, you may be a step ahead. Else you will want to navigate to the MySQL HeatWave on AWS landing page. Here you will enter your cloud account name (may already be cached by the browser) and click Continue.
On the next page you are prompted for the user ID and password you created during the sign-up process. Once everything is entered correctly you will find yourself on the MySQL HeatWave dashboard.
Create a MySQL DB System with HeatWave Cluster
Now the fun begins! Let’s get to provisioning.
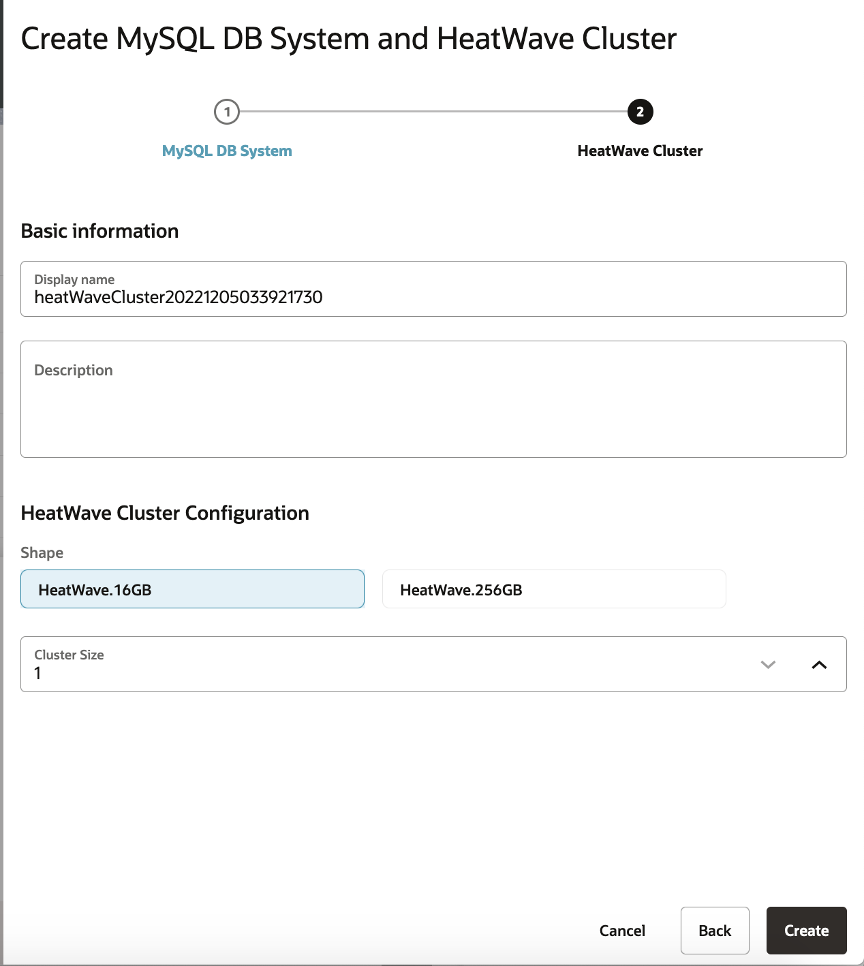
Click Create MySQL DB System on the dashboard to bring up the Create MySQL DB System and HeatWave Cluster dialog. This first portion is focused on configuring the underlying MySQL instance and HeatWave cluster itself.
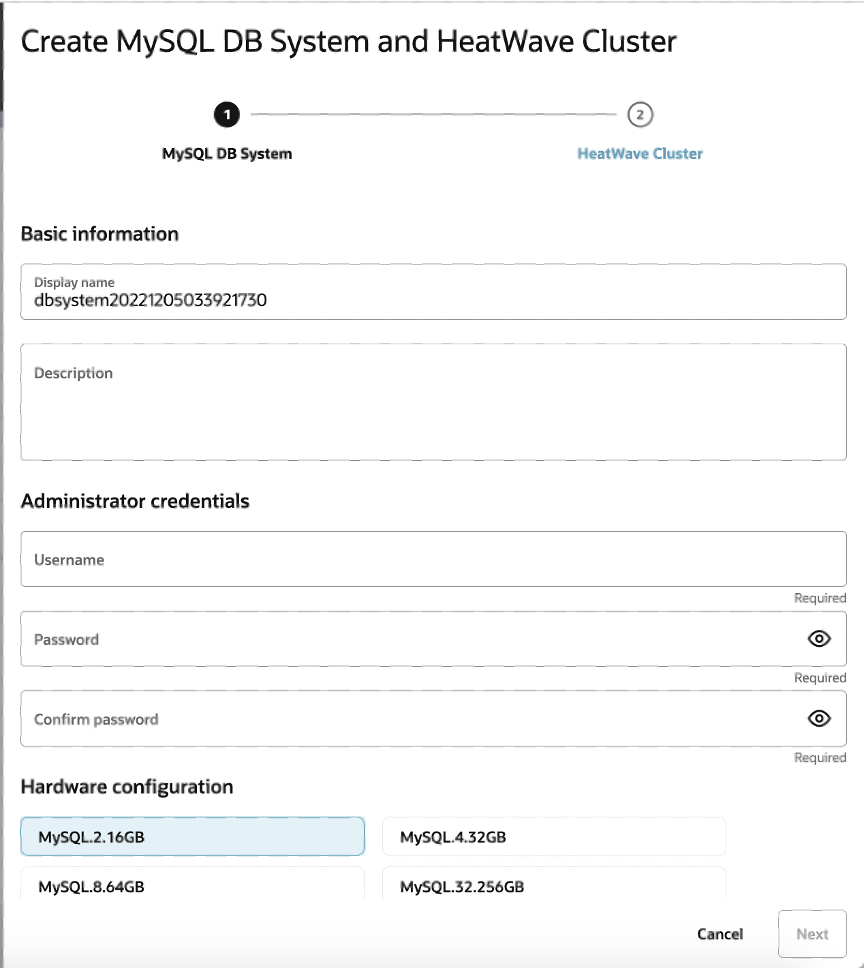

Fill out the required details:
Load sample data
Now that everything is up and running, let’s load some data and put this thing to the test.
Open a new browser tab and log into the OCI console to access Cloud Shell. If prompted for credentials, you will use the same cloud account, username, and password as entered when logging into HeatWave.
Open the OCI Cloud Shell

Retrieve the sample database: airport-db
wget https://downloads.mysql.com/docs/airport-db.tar.gz
tar xvzf airport-db.tar.gz
Locate the public IP address associated with your Cloud Shell environment. This will be added to the MySQL Allowed client addresses.
dig +short myip.opendns.com @resolver1.opendns.comReturn to the MySQL dashboard and edit the MySQL DB instance. Add the public IP address with /32 to the Allowed client addresses and click Save.
Return to the browser tab with Cloud Shell and start a MySQL Shell session. You will need the admin username and password supplied when creating the DB System. You will also need the Host Name copied earlier. mysqlsh username@hotname After pressing enter, you will be prompted for the password.
Use loadDump to import the database that was unzipped previously.
util.loadDump("airport-db", {threads: 16, deferTableIndexes: "all", ignoreVersion: true})This step might take a few minutes. Now is a great opportunity to grab a quick snack or check the weather forecast.
Run a few simple queries…just for good measure
We will compare performance against HeatWave a bit later. The MySQL shell is a pretty powerful tool but the interface isn’t for everyone. Before we move on, let’s run a few more queries just for fun; a great chance to flex those command line muscles.
Why don’t we try picking up a few more rows in our query: select * from airplane limit 10000;
Looking good? Just one more…for fun! mysql SELECT booking.price, count(*) FROM booking WHERE booking.price > 500 GROUP BY booking.price ORDER BY booking.price LIMIT 10; Make note of execution time.
Exit the MySQL Shell by typing ‘\d’ and pressing ENTER.
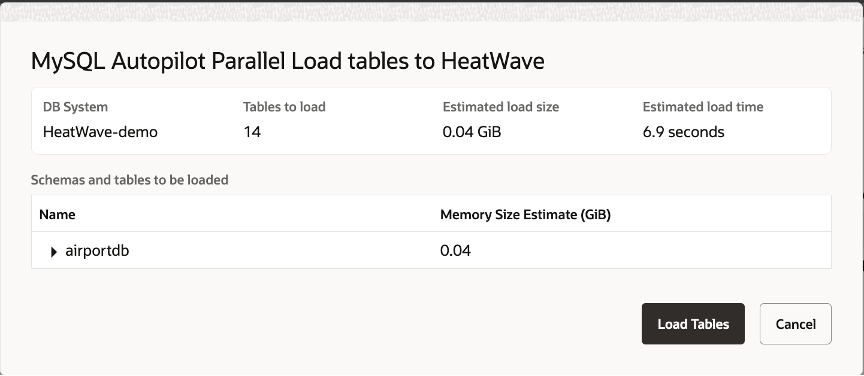
mysql SELECT booking.price, count(*) FROM booking WHERE booking.price > 500 GROUP BY booking.price ORDER BY booking.price LIMIT 10; Note the time it takes to complete…and get ready!Go to Manage Data in HeatWave tab, select airportdb, this will select all tables in the DB. Click Load into HeatWave button.

This will bring up a window that outlines the task and provides an estimated time to completion. After giving it a quick once-over, click Load Tables.
Once you load a new table into HeatWave, it will automatically track and load all data going forward. Or, at least until you UNLOAD that table.
SIDE NOTE: If you don’t need the power of HeatWave for a while you can always stop it to help keep costs low. While it is stopped, the system will continue to track data DIFFS for all loaded tables. When HeatWave gets fired back up, it will automatically update the loaded tables.
Run the previous query again and note the performance difference.
Feel free to experiment with larger data sets and/or more complex queries. Any time you want to test peformance benchmarks between InnoDB and HeatWave, you need only unload, then re-load the tables.
That brings us to the end. You can either terminate, stop, or leave running the resources you created…and don’t forget to pat yourself on the back. Great job!
Thus far we’ve created a MySQL database instance and HeatWave cluster on AWS, loaded some data, and poked around the system a bit. You saw the dramatic performance improvement gained by running queries in HeatWave…all without the need to ETL any data between systems. With all this power at your fingertips, we highly encourage you continue to explore the performance and capabilities. We’ve only just scratched the surface!
Want to know more? Join the discussion in our public Slack channel!


